

What Causes Peptide Discoloration in Research Samples?
Peptide discoloration traces to four dominant degradation pathways: oxidation, aggregation, hydrolysis (including deamidation), and enzymatic cleavage. Two of these announce themselves visually. Aggregation and advanced oxidation produce cloudiness, particulates, or yellowing you can see under standard lab lighting. Hydrolysis and low-level oxidation usually do not. A peptide can lose meaningful potency while remaining perfectly clear in the vial.
That gap between appearance and actual chemical state is the operational problem this article solves.
- Visible signs (cloudy, particulate, yellow/brown): discard the sample. These indicate aggregation or oxidation advanced enough to alter the chromophore structure.
- No visible change: do not assume integrity. Run reversed-phase HPLC or LC-MS, or cross-check against the Certificate of Analysis before use in any experiment where quantitative accuracy matters.
Statistic callout: Peptides degrade through hydrolysis, oxidation, aggregation, and enzymatic cleavage as the four primary mechanisms, and only a subset of that damage is detectable by eye.
Key Takeaways
Peptide discoloration signals aggregation or advanced oxidation when visible, but hydrolysis, deamidation, and low-level oxidation cause equally serious damage without changing appearance at all.
| Point | Details |
|---|---|
| Four degradation pathways | Oxidation, aggregation, hydrolysis/deamidation, and enzymatic cleavage each leave a distinct chemical signature. |
| Visible ≠ complete picture | Cloudiness and yellowing mean discard; clear solutions still need HPLC or LC-MS confirmation. |
| Sequence predicts risk | Asp-Gly, Asp-Pro, and Asn-Gly motifs are hydrolysis and deamidation hot spots worth flagging early. |
| Lyophilized storage reduces risk | Freeze-dried peptides limit water-dependent hydrolysis and deamidation compared to reconstituted solutions. |
| COAs enable verification | Purity, identity, and impurity data from third-party HPLC/MS let researchers confirm integrity before use. |
Table of Contents
- Peptide Degradation Factors: The Chemistry Behind Color Change
- Reading the Signs: When Visual Inspection Is Enough (and When It Isn’t)
- How to Prevent Peptide Discoloration in Storage and Handling
- Using Certificates of Analysis to Verify Peptide Integrity
- What the Data Actually Tells Researchers to Prioritize
- Sources
Peptide Degradation Factors: The Chemistry Behind Color Change
Discoloration is a downstream symptom. The upstream cause is one of four chemical processes, and each has a distinct fingerprint that matters when you’re troubleshooting a batch.
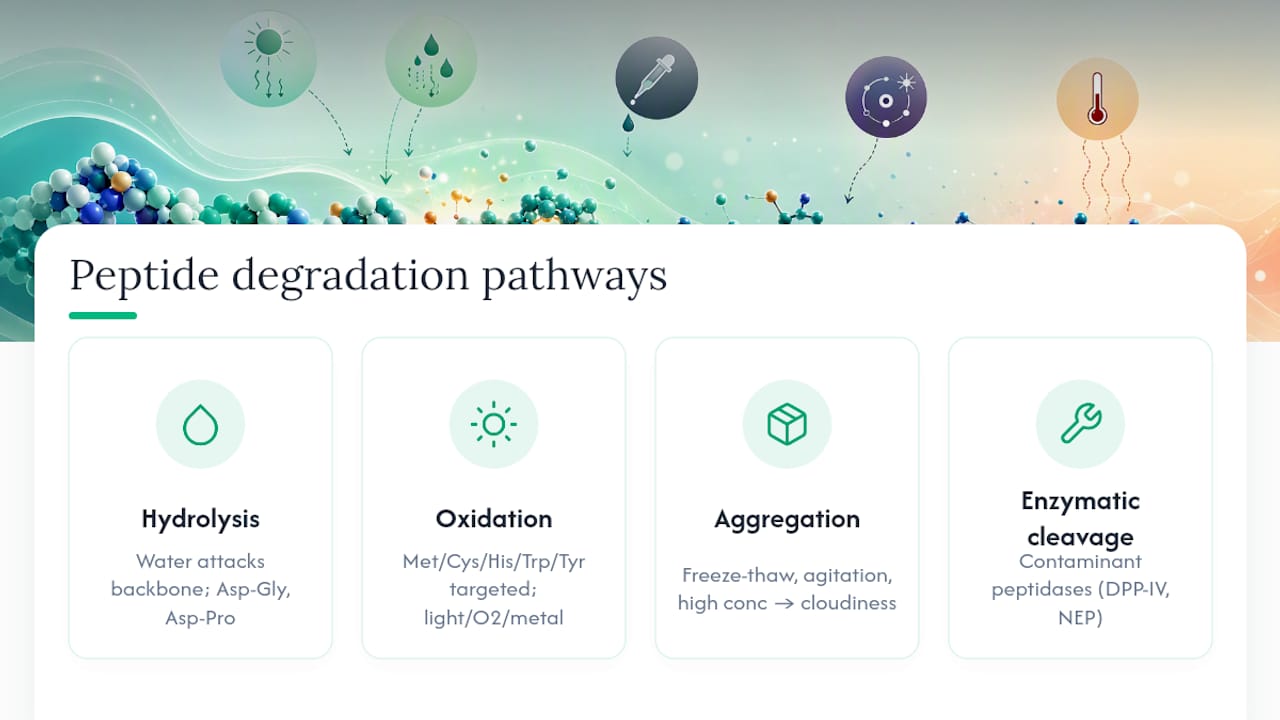
Hydrolysis and deamidation happen when water attacks the peptide backbone or a side-chain amide. Certain sequence motifs are disproportionately vulnerable: Asp-Gly and Asp-Pro bonds hydrolyze faster than typical peptide bonds because the aspartate side chain assists in ring formation that cleaves the adjacent bond, while Asn-Gly sequences deamidate readily through a similar succinimide intermediate. These reactions require water as a reactant, and rates roughly follow Arrhenius kinetics, meaning small temperature increases and pH shifts away from a peptide’s stability optimum accelerate degradation disproportionately. This is why a peptide stable at 4°C for months can show measurable breakdown after a week at room temperature.
Oxidation targets specific residues: methionine, cysteine, histidine, tryptophan, and tyrosine. Light, dissolved oxygen, and trace metal ions all accelerate oxidative attack on these residues, and photooxidation damage can continue progressing even after the light source is removed. That lag effect surprises a lot of researchers. A vial left near a window for an afternoon can keep degrading in a dark drawer days later.
Aggregation is mechanical rather than purely chemical. Repeated freeze-thaw cycling, vigorous agitation, high concentration, and air-liquid interface stress all push peptide chains into misfolded clusters. Three or more freeze-thaw cycles typically produce aggregation significant enough to see. This is the pathway most directly responsible for visible cloudiness and particulates.
Enzymatic cleavage is a contamination story, not an intrinsic stability issue. Peptidases like DPP-IV or neutral endopeptidase (NEP), introduced through non-sterile handling, contaminated buffers, or reused equipment, chew through susceptible bonds and can generate fragment peaks on HPLC without any visible sign at all.
Sequence and structure determine which pathway dominates for a given peptide. Linear peptides without reactive residues tend to be hydrolysis-limited. Peptides carrying disulfide bonds carry an added risk: disulfide scrambling, where bonds reshuffle into non-native pairings under oxidative or thermal stress, altering both structure and, sometimes, appearance.
Pro Tip: If you’re comparing stability across a peptide library, flag any sequence containing Asp-Gly, Asp-Pro, or Asn-Gly before you even start testing. Those motifs predict which candidates will need tighter storage controls, regardless of what the vial looks like on day one.
Reading the Signs: When Visual Inspection Is Enough (and When It Isn’t)
Visual inspection has a narrow but real job. It catches aggregation and advanced oxidation reliably. It misses almost everything else.
- Cloudiness or visible particulates. This is aggregation. Freeze-thaw stress and mechanical agitation are the usual drivers, and the correct response is discard, not attempted filtration and reuse.
- Yellowing or browning. This points to advanced oxidation, often through Maillard-type or tyrosine/tryptophan oxidation byproducts. Treat as a discard signal.
- Clear, colorless solution with no particulates. This tells you nothing about hydrolysis, deamidation, or low-level oxidation. Visual clarity does not confirm potency; analytical confirmation is the only way to rule out invisible degradation.
Statistic callout: invisible damage requires instrumentation, not inspection. Reversed-phase HPLC quantifies purity loss and fragment peaks, while LC-MS identifies exact mass shifts corresponding to oxidation, truncation, or deamidation products.
For rigorous testing, run a fresh reference vial alongside the sample in question, include spike/recovery controls, and use UV/Vis when the peptide has a relevant chromophore worth tracking over time. Skipping the reference vial is the most common shortcut that produces ambiguous, uninterpretable HPLC traces.
How to Prevent Peptide Discoloration in Storage and Handling
Prevention comes down to controlling four variables at once: moisture, temperature, light, and oxygen exposure. Each targets a different degradation pathway, and none of them substitutes for the others.
- Store lyophilized whenever possible. Freeze-dried peptides are markedly more stable than reconstituted solutions because hydrolysis and deamidation require water as a reactant. Keep vials sealed, dry, and paired with a desiccant, and minimize headspace air whenever you reseal a container. Neolabpeptides’ lyophilized peptide storage guide walks through the specifics by peptide class.
- Reconstitute carefully. Use chilled, degassed, sterile buffer at the pH appropriate for that peptide’s stability profile. Mix by gentle inversion, not vortexing. Vortexing introduces air and shear stress that push a freshly reconstituted peptide straight toward aggregation before you’ve even run a baseline test.
- Control temperature rigorously. Most lyophilized peptides are stable at 2 to 8°C for shorter-term storage and at negative 20°C for long-term storage, though the exact requirement varies by sequence. Avoid repeated freeze-thaw cycling; each cycle adds aggregation risk that compounds with the next.
- Block light and metal exposure. Store in amber vials or wrap containers in aluminum foil. Use metal-free containers where trace-metal-catalyzed oxidation is a known risk, and consider antioxidant or chelator additives when your formulation allows it.
- Practice strict aseptic technique. Single-use aliquots, sterile filters, and clean equipment prevent the peptidase contamination that drives enzymatic cleavage. This also matters for endotoxin control, covered in Neolabpeptides’ endotoxin testing guide.
Pro Tip: Aliquot immediately after reconstitution instead of pulling repeatedly from one working vial. It costs a few extra tubes and saves you from discovering, three freeze-thaw cycles in, that your entire batch has gone cloudy.
Temperature control during transit matters just as much as storage once the peptide is on your bench. Cold-chain gaps during shipping are a frequently overlooked source of pre-emptive degradation, addressed in the cold chain shipping guide.
Using Certificates of Analysis to Verify Peptide Integrity
A Certificate of Analysis is your first line of defense against unknowingly working with a compromised batch, but only if you know how to read it. A useful COA states identity confirmation (typically by mass spec), purity percentage from HPLC, the assay conditions used to generate that number, an impurity profile listing known byproducts, and stability or expiration guidance tied to specific storage conditions.
- Identity and purity: confirm the HPLC purity figure and cross-reference the mass spec identity against the expected molecular weight.
- Impurity profile: look for named degradation products, not just a single purity percentage with no breakdown.
- Storage and stability notes: these tell you what conditions the purity claim assumes; deviating from them invalidates the COA’s guarantee.
Third-party HPLC and mass spectrometry verification is what separates a credible COA from a marketing claim, and Neolabpeptides documents 98%+ purity across its catalog using exactly those methods, alongside detailed guidance on reading a peptide COA. If a sample shows any sign of discoloration, request a retest before drawing conclusions from questionable data. A supplier confident in its process will support that request without pushback.
What the Data Actually Tells Researchers to Prioritize
Most discussions of peptide stability spend too much time on storage temperature and not enough on sequence analysis before the peptide ever reaches a freezer. That’s backward. If you know a candidate contains Asp-Gly or Asn-Gly motifs before you order it, you can budget for tighter cold-chain handling and more frequent HPLC checks from the start, instead of discovering the problem after a batch turns cloudy mid-experiment.
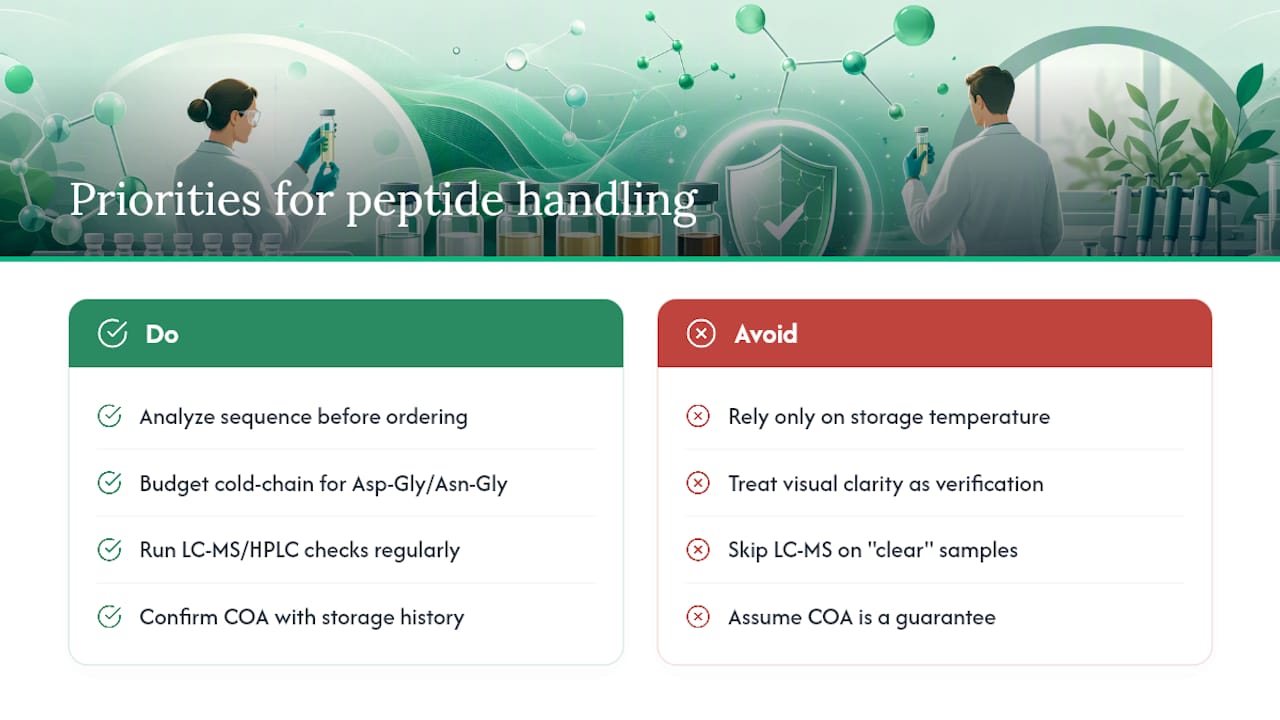
The other place conventional advice falls short: treating visual inspection as a meaningful quality gate. It isn’t, beyond catching aggregation and gross oxidation. Labs that skip LC-MS confirmation on “clear” samples are running experiments on peptides they haven’t actually verified. That’s not a minor gap in rigor. It’s the difference between a result you can defend in peer review and one you can’t.
If there’s one practical shift worth making, it’s this: treat the COA as a starting hypothesis, not a guarantee, and confirm it against your own storage history whenever a result looks off.
— Stephan
Sources
- Biopharmaceutical product stability considerations, overview of protein and peptide degradation pathways
- Peptide stability and potential degradation pathways — Sigma-Aldrich technical article
- Peptide Degradation: Stability, Storage, and Shelf Life